Is Partitioning a hard disk into multiple drives bad?

Hard Disk drives partitioning and accessing speedHard disk partitioning is almost a must, according to what I have heard so far from my colleagues and other professionals (may be same for you). I am used to partition a hard disk at least to three drives; "C" for OS (Operating System), "D" for programs and "E for other files like documents, archives. But I got a chance to read some material on hard drive performance and it completely argued my partitioning practices.

When considering the speed in reading a file from hard drive following are two important points related to partitioning.

1. Files in outer tracks are readable much faster
It is a well known theory in hard disk read/writes that performance is much higher in outer tracks compared to inner tracks.

2. When partitioning a hard disk, the first partition is created in the outer tracks
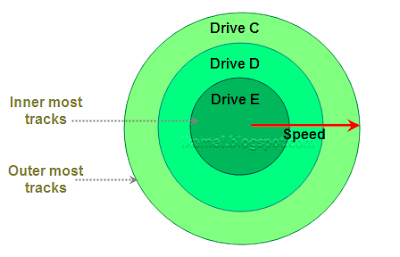
In creating partitions, the first partition is created in the outer most tracks while each new partition is created in inner tracks than the previous. So the partitions in a hard disk would look as the above diagram.

These two are important point to consider. We are creating partitions in order to organize the files according to mentally created categories; like operating system in one partition while program files in another partition. But I did not organize the files in the frequency they are used (which I should have thought of). There are some files frequently used, but placed in different drives without knowing this speed factor. For example; some java projects are stored in drive "E" which I happened to use daily.

So what are the solutions we can think of, in order to achieve the best performance of the hard disk considering these facts? I can think of following two solutions.

1. Create only one partition
One option would be to refrain from creating more than one partition and storing all the files in there. Then we would have to store the most frequently used files in outer tracks while hardly used ones in inner tracks. However this is not that possible, since user is not deciding the location of a file when saving into hard drive. The only solution will be to use a defragmenting software to organize the files later according to the accessing frequency.

2. Store files on partitions according to the frequency of use
We would create a set of partitions same as we used to do earlier, but with a different intension. Files will not be saved in each drive depending on the type or categories, but according to the frequency. The most frequently used files will be stored in drive C while least used files in Drive E. But then again, memorizing the file locations will not be easy.

What is the method are you using in your computers? Do you have any experience in above mentioned suggestions? We welcome your ideas and experiences or any other suggestions.

Cellspacing vs cellpadding - Table attributes comparison

In HTML Tables (<table>) there are two attributes named, cellpadding and cellspacing. What is the different between cellpadding and cellspacing? Both these are capable of creating some empty space inside a table.

cellspacing : space between cells
cellpadding : space between the cell border and it's content

Look at the diagram to clarify this further. As the word "cellspacing" suggests, it denotes the spacing between cells; it is something easy to remember. "cellpadding" keyword can be considered in relation to the "padding" attribute in HTML/CSS; padding is used to denote the space between the content and border of box type elements.

Following is a simple code example to demonstrate the difference.

<table cellspacing="15px" cellpadding="20px" bgcolor="#00EE00" width="300px">
<tr>
<td
bgcolor="#339966">
<div
style="background:#FFFFFF;">Cell 1 content</div>
</td>

<td bgcolor="#339966">
<div
style="background:#FFFFFF;">Cell 2</div>
</td>

</tr>
</table>

Cell 1
Cell 2

Check the difference. We have set the table background to light green color, so all the cellspacing is viewed in light green as it is the space between cells. The dark green sections are the spaces created with cellpadding; the space in white is available for the content in table cell.

If Michael Phelps is a country himself alone

What if Michael Phelps is a country himself alone rather than representing United States of America? Michael Phelps has already gathered 8 Gold medals in Beijing Olympics 2008 including 3 relays. Most of the participating countries happened to go back empty hand, so many players are participating knowing they are not up to the level of winning a medal. But consider this man, he's breaking world records in most appearances.

If he is playing himself alone as a separate country named "Phelps" he would still have 5 Gold medals and ranked as 11th country in Beijing Olympic medal table. Around 200 countries will be behind him. Medal table would look as follows.

RankCountryGold
1China35
2USA14 (19-Phelps)
3Australia11
.....
11Phelps5

He is creating new history with a set of world records and we are really proud to see such a person in this planet. We doubt any one living right now in this planet will be able to witness another performance like this in their lifetime. If they could, it will be again only by this big man. This is fabulous! one person winning 8 Olympic Gold medals while so many countries are trying at least to win one bronze medal for their country to mark their presence.

Now Michael Phelps has 14 Olympic Gold medals in three Olympics becoming the most Olympic Gold medal holder in the world. As he is only 23 years, this is going to be just the beginning in his career and all of us wish him to swim more than 10 years to create so many world records to raise the standards in this planet into a superior level.

We love to see an amazing man like Michael Phelps in this planet.

Permutations in C++

A small simple sample that illustrates how to get the various permutations of the characters of a string in C++ using std::next_permutation provided under the standard include <algorithm>.

[code]
#include<algorithm>
#include<string>
#include<vector>
#include <iostream>

int main()
{
    std::string input="ABC";
    std::vector<std::string> perms;
    perms.push_back(input);
    std::string::iterator itBegin = input.begin();
    std::string::iterator itEnd = input.end();
    while(std::next_permutation(itBegin, itEnd))
    {
        perms.push_back(std::string(itBegin, itEnd));
    }
    std::copy(perms.begin(), perms.end(), std::ostream_iterator<std::string>(std::cout, "\n"));
}
[/code]

Creating a Simple Countdown Timer Using JavaScript II...Using getElementById() Method

Using getElementById(id) Method


Speaking of yesterday’s post, it had the following problems:


1. It could not easily be embedded into an existing page.

2. It could not be placed wherever we wanted it to be
nor it could be aligned or styled easily.

3. Rather than updating the same number to countdown it
showed a series of numbers as countdown proceeded.


Well all these problems can easily be solved by one of JavaScript’s powerful
method getElementById(). This is documents’s
method which can be used to access HTML entities within JavaScript with the
help of their IDs (which is unique).


For example we can access the HTML entity and its values etc. with the ID one
as:


document.getElementById("one")


The HTML object may be defined like below:


<p id="one">some text</p>


You get!


OK, how can this be used to solve our problems, let’s see.


As we know, the HTML entities such as <p>,<div>, <span>
etc. can be placed anywhere very easily. They can also be styled and aligned
perfectly. So if we could print the timer in one of these, it’d be the
most efficient technique. How? Using getElementById().


The body of tags such as <p>, <div> or <span>
can be accessed via JavaScript as:


document.getElementById("one").innerHTML


e.g.: If we execute the following code:


document.getElementById("one").innerHTML="hello!!";


it’d be same as having the following HTML tag:


<p id="one">hello!!"</p>


This way two of our problems have been solved. What about the third one? It
too has been solved, if you look closely.


For example when you write:


document.getElementById("one").innerHTML="First";


And then:


document.getElementById("one").innerHTML="Second";


The <p> would be displayed as having the text “Second”.


OK, below is the completed code:


<!DOCTYPE HTML PUBLIC "-//W3C//DTD HTML 4.01 Transitional//EN">
<html>

<head>
<title>JavaScript Countdown Timer</title>
<meta http-equiv="Content-Type" content="text/html; charset=iso-8859-1">
<script language="JavaScript" type="text/JavaScript">

//to store timeout ID
var tID;
function tickTimer(t,id)
{
//if time is in range
if(t>=0)
{
document.getElementById(id).innerHTML=t;
t=t-1;
tID=setTimeout("tickTimer('"+t+"','"+id+"')",1000);
}
//stop the timeout event

else
{
killTimer(tID);
document.getElementById(id).innerHTML="Time Out!!";
}
}

//function to stop the timeout event
function killTimer(id)
{
clearTimeout(id);
}
</script>

<!--style the ID -->

<style>
#timer {
background: #000;
color: #fff;
font-size: 20px;
}
</style>
</head>
<!--pass the id to timer has to attached to -->
<body onLoad="tickTimer(9,'timer')" onUnload="killTimer(tID)">

<p>Timer: <span id="timer"></span></p>
</body>
</html>


It depends on what you intend regarding which tag you should use to place to
timer. If you want it to be inline with some text use <span>.
<p> would make it to be in a different paragraph.


So in this post we saw a very powerful method getElementById()
which can be used to access HTML objects and manipulate them. Check back for
more!


Previous Posts:


Creating a Simple Countdown Timer Using JavaScript

Creating a Simple Countdown Timer Using JavaScript


Some JavaScripting today! We are going to create a simple countdown timer using
JavaScript. What’s the use? Umm, I really am not creative enough to find
any of its perfect use but it could be used somewhere, sometimes…and there
is no harm in learning something even when there seems to be no potential use
of it. Who knows maybe you’d need it sometime to add creativity to your
web pages. Of course some of the techniques that we are going to use will be
needed at many times, so you won’t wanna miss this!


This time , let’s start off with the code first:


<!DOCTYPE HTML PUBLIC "-//W3C//DTD HTML 4.01 Transitional//EN">
<html>
<head>
<title>JavaScript Countdown Timer</title>
<meta http-equiv="Content-Type" content="text/html; charset=iso-8859-1">
<script language="JavaScript" type="text/JavaScript">
//to store timeout ID
var tID;
function tickTimer(t)
{
//if time is in range
if(t>=0)
{
document.writeln(t);
t=t-1;
tID=setTimeout("tickTimer('"+t+"')",1000);
}
//stop the timeout event
else
{
killTimer(tID);
document.writeln("<br /> <font color='#ff0000'>Time Out!</font>");
}
}

//function to stop the timeout event
function killTimer(id)
{
clearTimeout(id);
}
</script>
</head>

<body onLoad="tickTimer(10)" onUnload="killTimer(tID)">
</body>
</html>


Now let’s analyze the code:


1. We have created two functions tickTimer()
and killTimer().

2. We have defined two event handlers onLoad
and onUnload which’d call the respective functions at respective
events.


When the code above (as a web page) is executed, it’d proceed as:


1. First the onLoad event calls tickTimer
function with the initial time, the countdown timer has to be ticked down form.


2. The function displays the initial time remaining,
does some calculations and calls a method setTimeout().


3. The setTimeout function now calls the
function passed, every 1000 milliseconds 1 second). On setting the timeout event
this method returns a unique ID which would be used to stop the timeout event
when needed (onUnload or when timer has ticked down to 0).


One thing you may get confused with is how without loop or anything as such,
are we able to count the timer down. Answer is, because JavaScript is an event
driven language. First, we are defining a body onLoad event to
make a call to some function as the web page is loaded. Second, we are defining
a timeout event that would call the function itself (recursive call) every one
second indefinitely until the timeout event is cleared. We are clearing the
timeout either when the countdown timer reaches 0 or when the page gets unloaded
(onUnload).


Had JavaScript not been an event driven language, we’d need to have a
loop to check when a second has elapsed and update the variable accordingly.
Luckily we don’t have to!


But as it is, can we embed or place the above timer in a web page the way we
want, styled and perfectly aligned. Or how about a single number getting counted
down rather than showing all the numbers as the countdown proceeds. We’ll
see that in the next post!


Previous Posts:


Distributed Storage

Here we explore the consistency aspect of a distributed storage model. The motivation of using a distributed storage is for scalability, fault resiliency and cost reasons. The architecture is based on a large number of inexpensive (and unreliable hardware).

At the software level, we need to deal with
  • Partitioning -- How to partition our data among different servers
  • Replication -- How do we maintain copies of data in a consistent way

Distributed storage architecture


Supported Operations

We support a REST-based CRUD operations ...
  • put(key, value)
  • post(key, value) -- Semantics equivalent to "append"
  • delete(key)
  • get(key)

Consistency Models

Three model will be discussed

Full consistency
  • Update request will not be returned until the changes has been applied
  • Read request will always return the latest successfully updated data
Eventual consistency
  • READ request may return an outdated copy, but will never return an inconsistent copy (which doesn't exist in any serializable history)
  • All update will eventually be processed and viewable. Also, given enough silence (no update for some period of time), GET will eventually return the latest value.
Read-what-I-wrote
  • READ request may return a copy which is equal to or later than the version of the last update of the same user
  • For UPDATE request, same behavior as "eventual consistency"

Algorithms for Processing

Full consistency

There is no need for the operation queue in this case. Lets skip the operation queue and directly update the persistent state.
A version is attached to the data value per key. The version number is advanced when the update is successful.

PUT processing
  • Make parallel write request to R replicas, wait for Q success response within timeout period, return success.
  • Otherwise return failure. The data value is inconsistent and no operation can be proceed for this key until the consistency issue is manually fixed. (lets take a naive approach for now). The probability of failing can be reduced by increasing the value of R and Q.

GET processing
  • Make parallel read request to R replicas, wait for Q response that has the same version number, return its data value, otherwise return failure.

Background replica synchronization
  • Exchange version number periodically with remaining (R-1) replicas, if my version is different from the quorum Q, update myself to make it the same.

Eventual consistency

We need the operation queue. There is a background thread that asynchronously process the operation queue to update the persistent state.

PUT processing
  • Make parallel write request to R replicas, wait for M success response within timeout period, return success. (When receiving a write request, the replica will read the current version number V of the state and attached version number V+1 to the update operation).
  • Otherwise return failure. The data value is inconsistent. Again, the probability of failing can be reduced by increasing the value of R.

GET processing
  • Make parallel read request to R replicas, wait for first response and return its data value, otherwise return failure.

Background replica synchronization
  • We need a more sophisticated conflict resolution algorithm to merge operations which has the same version number. Following is what come to my mind (without analyzing in depth)
  • Starting from the M replicas, operation request is propagated among replicas in the background.
  • When Q replicas got the same operation request, it applies the operation to the persistent state and update its version number.


Read-what-I-wrote


PUT processing
  • Same as Eventual Consistency model
  • After successful update, store the version number (latest updated) in the user session

GET processing
  • Make parallel read request to R replicas, wait for first response which has the version number higher than the one stored in the user session, then return its data value and update the version in user session.
  • Otherwise, wait a moment and resend the READ request. (The user request timeout value should be set to be higher than the expected latency for background replica data synchronization)

Background replica synchronization
  • Same as Eventual consistency model

[Cricket] Most wickets in debut Test series - World record by Ajantha Mendis

Most wickets by a player in his debut 3-match Test series; a 60+ years old world record has been broken. By whom? By Sri Lankan newly found precious mystery spinner Ajantha Mendis. He produced this new world record yesterday, 2008-08-10 with the wicket of Sachin Tendulkar, another master of cricket. Up to now, he has got 25 wickets in this series, and he has passed the 24 wickets record held by English bawler named Alec Bedser.

Ajantha Mendis has so many variations, and so difficult to read from the hand. Most of the Indian batsmen are still struggling to play against him while he is improving with his variations and accuracy.

In the current India-Sri Lanka Test series he played in all 3 matches (and 6 innings) and performed fabulously. Still he is bawling in the 2nd inning of the last Test match and 5 more wickets are left in Indian team. So we wish Mendis to get some more wickets out of those and improve his record into an untouchable one in history.

Well done Menda.

Update:
Ajantha added another wicket to his record, now it's 26 wickets in a 3-match Test series. He is the man of the series in his debut.

Evaluating/Executing PHP Code at Run-Time Using eval() Function

OK, so today we are going to discuss about one of the interesting functions
of PHP. The eval() function. It is interesting in that it can evaluate/execute
PHP code from inside scripts. This means, the eval() function can evaluate PHP
code at run-time. The code itself in turn may be generated at run-time hence
it could be used to execute code that may not initially be a part of the script.


Let’s see some examples:


eval("echo 'hello';");


Which is equivalent to:


echo 'hello';


One more example:


<?php


$n
=10;

$code='';


for(
$i=0;$i<$n;$i++)


$code.="echo $i;";


eval(
$code);


?>


Here the code to be evaluated is generated at run-time too.


The code to be evaluated could be stored somewhere (like in a file or in database)
and later can be retrieved and evaluated.


As an example, below I’m providing the source code which would create
a page that could be used to run PHP code. It’d provide a HTML textarea
for you to type in the code which would then be executed and displayed. Be warned
however that this kind of page is extremely vulnerable and an open invitation
to hackers as anybody can use it to execute code on the server it is put in.
so DON’T put this onto tour or anybody else’s server you have access
to. It’d also be advisable to get off the internet before even trying
it on your local server and delete the file afterwards. Believe me I’ve
experienced hackers trying to access even local servers!


<?php echo "<?xml version=\"1.0\" encoding=\"iso-8859-1\"?".">"?>


<!DOCTYPE html PUBLIC "-//W3C//DTD XHTML 1.0 Transitional//EN" "http://www.w3.org/TR/xhtml1/DTD/xhtml1-transitional.dtd">


<html xmlns="http://www.w3.org/1999/xhtml">

<head>

<title>Untitled Document</title>

<meta http-equiv="Content-Type" content="text/html; charset=iso-8859-1" />


</head>


<body>

<h2>Run Script</h2>

<form name="form1" id="form1" method="get" action="">


  <p>

    <textarea name="code" cols="50" rows="15" id="code"></textarea>


  </p>

  <p>

    <input type="submit" name="Submit" value="Execute!" />


  </p>

</form>

<p><strong>Output:<br />

  -----------</strong></p>

<?php

if(isset($_GET['Submit']))


{

    
$code=$_GET['code'];


    eval(
$code);


}

?>


</body>

</html>


Evaluating/Executing PHP Code at Run-Time Using eval() Function


Previous Posts:


Blogger: Changing Templates without Loosing Widgets

Blogger: Changing Templates without Loosing Widgets


The other day when I was trying to change the Template of this blog I faced
a rather disheartening problem. Blogger said that all the Widget along with
their data will be lost when changing to a third-party template. As you can
see I have a link list (big one) on the sidebar, it has links to all my posts
so far (>180!), man could I afford to loose that? Of course NOT!


Good thing was switching to one of the templates provided by Blogger wouldn’t
make me loose those widgets. Bad thing is I don’t like those templates.
Those are all too old, excessively used everywhere and 2-column ones.


So what did I do to save my widgets when changing to a third party Blogger
template? Read along to know…(this might look like a crappy landing page
that’d sell you something, believe me its NOT!)


If you too are facing the same problem you can take these steps to save your
widgets:


STEPS:


1. Start off by going to Layout-> Edit HTML then click
on Expand Widget Template check box.


2. Search for <b:widget
in the template code and copy the widget section code.

e.g.:


...
<div id='sidebar-wrapper'>

<b:section class='sidebar' id='sidebar' preferred='yes'>

<b:widget id='HTML1' locked='false' title='Search this
Blog' type='HTML'>

<b:includable id='main'>

<!-- only display title if it's non-empty -->

<b:if cond='data:title != &quot;&quot;'>

<h2 class='title'><data:title/></h2>

</b:if>

<div class='widget-content'>

<data:content/>

</div>


<b:include name='quickedit'/>

</b:includable>

</b:widget>


<b:widget id='LinkList1' locked='false' title='Recent Posts' type='LinkList'>

<b:includable id='main'>


<b:if cond='data:title'><h2><data:title/></h2></b:if>

<div class='widget-content'>

<ul>

...


Do it as many times as needed to copy all the widgets. Paste them one after
to other in Notepad. You can leave the unnecessary ones such as Header, Blog
(There is a widget for this too, shows the posts) etc. the code of which would
look something like below:


No need to copy these:


  • <b:widget id='Header1' locked='true' title='For Testing Purpose
    (Header)' type='Header'>

  • <b:widget id='Blog1' locked='true' title='Blog Posts' type='Blog'>


3. Now copy the new template code by opening the XML
file in another Notepad. Paste it in Blogger deleting the old template code.


4. Find the following line in the newly pasted template
code:


...
<div id='sidebar-wrapper'>

<b:section class='sidebar' id='sidebar' preferred='yes'>

[--PASTE WIDGETCODE HERE--]


5. Paste all the widget codes previously copied there
right after the <b:section line.


6. Save the template.


7. If you had not copied some unnecessary widget codes
from the original template, Blogger might ask you to confirm their deletion.
Confirm this and SAVE the template.


8. Done!


Doing this you’d save existing widget from getting deleted when switching
template but the widgets will NOT be arranged or placed in any meaningful manner
(they’d all be in a sidebar). To re-arrange them in the manner you want
just go to Layout-> Page Elements and drag drop the widgets as required,
click save. You’re done!


Blogger: Changing Templates without Loosing Widgets  - Rearrange the Widgets


Previous Posts:


Verify calling Javascript function available to avoid runtime errors

Do you want to verify whether a Javascript function exists before calling it to avoid runtime errors? With Javascript we used to call Javascript functions. But sometimes our Javascript code tend to throw runtime errors and showing then on the browser. For this there can be several reasons including; incorrect function names or invalid .js file names causing some functions not loaded into your web page.

Javascript has the ability to check this. For that we can use the typeof keyword, and check whether that is of 'function' type or not.

Generally we will be calling a Javascript function without checking whether it exists. Following code shows how we would call a function.

function callClient(){
myTestFunction();
}

If the function named myTestFunction() is not available, the browser will show an error message at runtime. But we can check whether this method is available even before calling it, avoiding the errors. Following code snippet checks the existence before calling a function.

function callClient(){
if (typeof myTestFunction == 'function') {
myTestFunction();
} else {
alert("myTestFunction function not available");
}
}

In the above example, it checks the availability of the required function "myTestFunction" before calling it, and call it only if it exists. This will improve the user experience by avoiding unexpected error messages from the user.

Write Java with JDK 1.5 features and run on JRE 1.4

JavaHave you being writing your Java code on Java 1.5 (JDK 1.5) with new features like auto boxing, generics and enums? And suddenly realized that your customer's servers are still using Java 1.4 (JRE 1.4)? This is not a surprise since most of the customers are not in a position to take a risk and try the newer versions as they are running live/online businesses. But as professionals in the software development field, we have to move with the latest/stable versions available in the market. That's where the conflict occurs.

Now you must deploy your Java 1.5 codes into a 1.4 Java runtime environment (even may be 1.3 or 1.2). Even if the Java code has not used any of the new features of Java 1.5, you still can not run your code in 1.4 JRE as the runtime throws an error saying "java.lang.UnsupportedClassVersionError".

Compile 1.5 codes for 1.4 JVM

Java compiler provides an option to specify the target JVM of the generated classes like 1.5, 1.4, and 1.3 as follows.

public class MyClass {
public static void main(String args[]) {
System.out.println("Main Method");
}
}

> javac -source 1.4 -target 1.4 MyClass.java

Even if your JDK is of version 1.5, above command will compile your class so that it can run on a JRE 1.4. But the above option only works if your class does not use any of the new features in Java 1.5 (like auto boxing, enums etc).

Check the following class. Compiling it with "target" option will result in a compile time error.

public class MyClass {
public static void main(String args[]) {
Integer count = 1;
System.out.println("Main Method");
}
}

> javac -source 1.4 -target 1.4 MyClass.java

The compiler error is shown because auto boxing is not supported in 1.4.

This means that we can not use 1.5 features if we are going to run the programs on an older version. So this is not a real solution for our issue.

Can not run/deploy code with new features on 1.4 JVM?

Java retroweaver logoThere is an open source free solution to this issue. The tool is named "Retroweaver", and it can generate class files for older JREs using classes with new features of the 1.5 version. This is a nice tool and it supports most of the Java 1.5 features.

Retroweaver site says;

... supports most 1.5 features while running on 1.4.
  • generics
  • extended for loops
  • static imports
  • autoboxing/unboxing
  • varargs
  • enumerations
  • annotations

Also this has a good documentation (even though it's not up to date. Don't blame them; they are doing it for free).

This tool can convert .class files of 1.5 version to another older JRE version. Also it has the capability of converting a complete .jar file.

How Do I Color-Highlight PHP Source Codes

If you’ve been a regular reader of this blog you might have wondered
how I highlight PHP code using different colors. Your prompt answer would be,
using some software. Well not exactly as PHP has built-in feature for highlighting
source code. And of course I use that.


Here are some of the different methods that you can use to highlight PHP source
code, you may use any one of them depending upon what your intended purpose
is.


1. If have set-up PHP as explained in Configuring
Apache Web Server and PHP
then you can just name your PHP files like
“filename.phps” to tell PHP to highlight and show the file upon
request and not execute it. You can use this method when you want to link the
highlighted source from some web page. You cannot, however, embed source code
into web pages using this method.


PHP Source Code Highlighting - Using .phps Files


2. You can use the following function to highlight any
PHP (.php) script file:


highlight_file('filename.php');


You just have to pass the filename to this function and PHP will highlight
and output the code to the browser.


Main benefit with this is you can embed source code into your web pages wherever
you want.


e.g.:


<?php


echo "<h1>Blah Blah Blog</h1>";


echo 
"<h2>Highlighting PHP Source Code</h2>";


echo 
"<p>blah blah blah!!</p>";


echo 
"<p>Write anything you want and embed source code (highlighted)</p>";


echo 
"<p>Embedded source code is listed below:</p>";


highlight_file('highlight_file.php');


?>


PHP Source Code Highlighting  - Using highlight_file() Function


3. There are times when you just want to highlight a
single line of code which can be done using:


highlight_file('string
here')
;


It could be used when you have lost of unrelated lines of code to highlight.
In other words, when the codes are not together but are sprinkled throughout
the page. For this you don’t have to create any files to be highlighted,
just use this function with thee source code string.


e.g.:


<?php


echo "<h1>Blah Blah Blog</h1>";

echo 
"<h2>Highlighting PHP Source Code</h2>";


echo 
"<p>First String: <br />";

highlight_string("<?php echo \"<h1>Blah Blah Blog</h1>\"; ?>");


echo 
"<br />Second String: <br />";

highlight_string("<?php foreach($keywords as $keyword) ?>");


echo 
"</p><p>blah blah blah blah <br />blah blah blah</p>";

echo 
"<p>Third highlighted String: <br />";

highlight_string("<?php if(isset($s)) ?>");


echo 
"<p>Notice how many unrelated code strings are here. The best way to format them in this condition is to use ";

highlight_string("<?php highlight_string(\"string\"); ?>");

echo 
"function </p>";


?>


Which would show up like below:


PHP Source Code Highlighting  - Using highlight_string() Function


One interesting thing that you can play with, regarding syntax highlighting
is the “php.ini” file. Look for these lines in that file:


; Colors for Syntax Highlighting mode. Anything that's acceptable in

; <span style="color: ???????"> would work.

highlight.string = #DD0000

highlight.comment = #FF9900

highlight.keyword = #007700

highlight.bg = #FFFFFF

highlight.default = #0000BB

highlight.html = #000000


Here, as you can see, the colors for highlighting different parts of the code
are defined. You can change these to alter the colors that are use for highlighting.
Colors are in HEX RGB format (same as HTML color code).


NOTE: If you don’t seem to be able to see the source
code highlighted you might need remove the ";" (semi-colons) from
the starting of each of the "highlight." line so it looks like the
above code:


; Colors for Syntax Highlighting mode. Anything that's acceptable in

; <span style="color: ???????"> would work.

;highlight.string = #DD0000

;highlight.comment = #FF9900

;highlight.keyword = #007700

;highlight.bg = #FFFFFF

;highlight.default = #0000BB

;highlight.html = #000000


If only “.phps” PHP source files are not getting highlighted, you’ll
need to set-up PHP as described in Configuring
Apache Web Server and PHP
.


Previous Posts:


Web Scraping: Gathering "Related Searches" Keyword Data From Google Search Results

Web Scraping: Gathering "Related Searches" Keyword Data From Google Search Results


You might first want to read Basic Web
Scraping: Pulling Out Data From Google Search Results
.


In the other Basic Web Scraping post we created a Simple Web Scraper that retrieved
Google’s Search Result Pages for some keyword and scraped the “Number
of Pages” indexed for the keyword. That was a good starting point in learning
web scraping, that’s why in this post we’re going to extend that
scraper to return one more information, “Related Keywords”.


Actually, Related Searches is a bunch of keywords that Google displays at the
bottom of search result pages. These are not displayed all the keywords that
you search for, but only for keywords that are somewhat broad. These “related
Searches” are the keywords that Google has evaluated to be related with
the one searched for.


To scrape this, we’d first need to analyze the HTML code of Google Search
Result. We need to find out where the Related Searches block is in the code,
typically it’d like:


<h2 class=r>Searches related to:<b> computer programming</b></h2><table
border=0 cellpadding=0 cellspacing=0 style="margin-top:6px"><tr
style="font-size:84%"><td style="padding:0 30px 6px 0"
valign=top><a href="/search?hl=en&client=firefox-a&rls=org.mozilla:en-US:official&hs=lS4&q=computer+programming+schools&revid=92395746&sa=X&oi=revisions_inline&resnum=0&ct=broad-revision&cd=1">computer
programming <b>schools</b></a></td><td>&nbsp;</td><td
style="padding:0 30px 6px 0" valign=top><a href="/search?hl=en&client=firefox-a&rls=org.mozilla:en-US:official&hs=lS4&q=computer+programming+careers&revid=92395746&sa=X&oi=revisions_inline&resnum=0&ct=broad-revision&cd=2">computer
programming <b>careers</b></a></td><td>&nbsp;</td><td
style="padding:0 30px 6px 0" valign=top><a href="/search?hl=en&client=firefox-a&rls=org.mozilla:en-US:official&hs=lS4&q=computer+programming+languages&revid=92395746&sa=X&oi=revisions_inline&resnum=0&ct=broad-revision&cd=3">computer
programming <b>languages</b></a></td><td>&nbsp;</td><td
style="padding:0 30px 6px 0" valign=top><a href="/search?hl=en&client=firefox-a&rls=org.mozilla:en-US:official&hs=lS4&q=computer+programming+c%2B%2B&revid=92395746&sa=X&oi=revisions_inline&resnum=0&ct=broad-revision&cd=4">computer
programming <b>c++</b></a></td><td>&nbsp;</td></tr><tr
style="font-size:84%"><td style="padding:0 30px 6px 0"
valign=top><a href="/search?hl=en&client=firefox-a&rls=org.mozilla:en-US:official&hs=lS4&q=computer+programming+information&revid=92395746&sa=X&oi=revisions_inline&resnum=0&ct=broad-revision&cd=5">computer
programming <b>information</b></a></td><td>&nbsp;</td><td
style="padding:0 30px 6px 0" valign=top><a href="/search?hl=en&client=firefox-a&rls=org.mozilla:en-US:official&hs=lS4&q=basic+computer+programming&revid=92395746&sa=X&oi=revisions_inline&resnum=0&ct=broad-revision&cd=6"><b>basic</b>
computer programming</a></td><td>&nbsp;</td><td
style="padding:0 30px 6px 0" valign=top><a href="/search?hl=en&client=firefox-a&rls=org.mozilla:en-US:official&hs=lS4&q=computer+programming+for+dummies&revid=92395746&sa=X&oi=revisions_inline&resnum=0&ct=broad-revision&cd=7">computer
programming <b>for dummies</b></a></td><td>&nbsp;</td><td
style="padding:0 30px 6px 0" valign=top><a href="/search?hl=en&client=firefox-a&rls=org.mozilla:en-US:official&hs=lS4&q=game+programming&revid=92395746&sa=X&oi=revisions_inline&resnum=0&ct=broad-revision&cd=8"><b>game</b>
programming</a></td><td>&nbsp;</td></tr></table>

Remember our goal here is to find out certain footprint or consistent block
in the code (which always will be on every page we request), out of which the
needed data (Related Searches) can be pulled out.


Here, we can safely assume it to be:


<h2 class=r>Searches related to:


and


</td></tr></table>


So if we do a search for the above block in the code, we can easily pull the
required information.


Now, we can follow the following steps to scrape the required information:


  1. Retrieve the required page.

  2. Look for the consistent part of code that uniquely encloses or identifies
    the required information. Scrape that block.

  3. Pull the required data out.


Following is the code listing:


<html>

<head>

<title>Google Result Scraper</title>

</head>


<body>

<p align="center" style="font-size:500%"><font color="#0000FF">G</font><font color="#FF0000">o</font><font color="#FFFF00">o</font><font color="#0000FF">g</font><font color="#00FF00">l</font><font color="#FF0000">e</font> 


  <font size="2"><br />Result Scraper</font></p>


<?php

$s
=$_GET['s'];


if(isset(
$s))

{

    
//*******F I R S T   P A R T*********

    //Find the number of pages indexed for the searched term


    //*From previous part

    
echo "<p><i>Search for $s</i></p>";


$s=urlencode($s);


$main_data=file_get_contents("http://www.google.com/search?hl=en&q=".$s."&btnG=Google+Search");


//strip off HTML


$data=strip_tags($main_data);

    
//now $data only has text NO HTML


    //these have to ound out in the fetched data


$find='Results 1 - 10 of about ';

    
$find2=' for';


//have text beginning from $find


$data=strstr($data,$find);


//find position of $find2

    //there might be many occurence


    //but it'd give position of the first one, 

    //which is what we want, anyway

    
$pos=strpos($data,$find2);


//take substring out, which'd be the number we want

    
$search_number=substr($data,strlen($find), $pos-strlen($find));


    echo 
"Pages Indexed: $search_number";


//********S E C O N D   P A R T*******


    //Find related searches


echo "<h3>Related Keywords</h3>";


//these have to found out in the fetched data


$find='<h2 class=r>Searches related to:';

    
$find2='</table>';

    
$find3='<table border=0';


//have text beginning from $find

    
$data=strstr($main_data,$find);


//find position of $find2


    //there might be many occurence

    //but it'd give position of the first one, 

    //which is what we want, anyway


$pos=strpos($data,$find2);


//take substring out, this is the block of data


    //that we'd fetch required information off of.

    
$related_search_block=substr($data,strlen($find), $pos-strlen($find));


//pull out the required data, stripping off "Searches related to.."

    
$related_searches=strstr($related_search_block,$find3);


//now we only have the keywords, of course formatted as is

    //with tables


    //strip off HTML, therefore taking off table and various


    //other formattings

    
$related_searches=strip_tags($related_searches);

    
//now we have the keywords (plain text) sepearted with 


    //each other using "&nbsp;'


    //explode it

    
$keywords=explode('&nbsp;',$related_searches);


//now we a nice array having all the keywords


    //print the keywords

    //nicely formatted using <ol> (ordered list)


echo "<ol>";

    foreach(
$keywords as $keyword)

    {

        if(
$keyword!='' && $keyword!=' ')


        echo 
"<li>

                $keyword

             </li>"
;

    }

    echo 
"</ol>";    

}

else


{

?>


<form name="form1" id="form1" method="get" action="">

  <div align="center">

    <p> 

      <input name="s" type="text" id="s" size="50" />


      <input type="submit" name="Submit" value="Find Related Keywords" />

    </p>

  </div>

</form>

<p>&nbsp;</p>


<p>&nbsp;</p>

<p>&nbsp;</p>

<p>&nbsp;</p>

<p>

  <?php

}

?>


</p>

<p align="right"><font size="2">by <a href="http://learning-computer-programming.blogspot.com/">Learning 

  Computer Programming</a></font></p>


</body>

</html>


Although this script is not very useful as it is (after all it’s meant
for learning purpose) you can make it more useful by extending it. one thing
that’d be nice is to hav it search for related keywords and again take
each keyword as a base for further searches. This way it’d be able to
supply you with many keywords related to the one entered. Best thing is, the
keywords will be Googly Related!


Previous Posts:


Check out this stream